

Porsche GT3 - Six Day Gyeon Detail
- Jan 16, 2019
- 11 min read
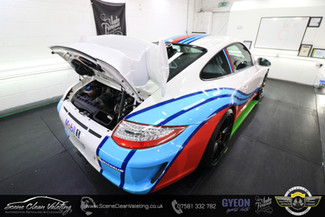
Porsche have a pretty well rounded range of sports vehicles at present, from a luxury performance SUV range through to pure bred track toys that are road legal and even a hybrid hypercar pushing the boundaries of what can be achieved from a modern car thrown in for good measure. Even a a decade ago, Porsche were still at the forefront of the performance car market with nothing short of enjoyment and build quality oozing out of every inch. It really is simple to understand why the Porsche brand is so hugely loved by people of all generations, they offer everything to everyone. The Porsche GT3 is a toned down version of the hardcore track ready GT3RS, still offering sublime handling and performance but with some creature comforts for a better day-to-day experience when touring across Europe, which is what the owner of this particular GT3 often does whilst posting his adventures and 'hoonigans' on Instagram. Purchased from new, our client had the full vehicle protected with paint protection film (PPF) to prevent stone chips, scratches and general daily life damaging the underlying paint. Only the complex rear engine cover and the rear bumper were left unprotected. A year or two later, the car was taken to one of the most known vehicle wrapping companies in the UK, Yiannimize, in order to transform the GT3 from an ordinary plain white to a full Martini Porsche livery which highlights the curves of the rear arches very well. Bring time forward by a few years as well as many European road trips later and the car was looking a little tired overall and need of some in-depth TLC to restore a finish to match the stand-out nature of its graphics.


We started the Porsche’s detail by focusing on the deep cleanse of the arches and suspension components. Due to the wheels being a centre lock design, we decided that we would leave them in place for the initial cleaning process, simply as these wheels require special care when removing and refitting we thought it would be better to remove them only once later on. The car was lifted and supported suitably whilst an initial pressure rinse of all accessible areas blasted away any loose dirt and grit, this was then followed by a liberal spray of an all-purpose cleaner (APC) agitated with multiple brushes to lift any remaining soiling. Large quantities of tar deposits were given an application of a solvent based tar remover and a microfiber towel was used to collect the dissolved spots. Any remaining spots for given a reapplication until all visible deposits had been removed. A pressure rinse of the arch removed any residues and lifted soiling, leaving only a few areas difficult to reach whilst the wheels were still in place (this will be tackled later). The car was then lowered off its supports and we moved onto the bodywork preparation; we would normally clean the wheels at this point, but as they are going to be refurbished it would be an ineffective use of time as they were to be fully stripped as part of that anyway.


We opened up the rear engine cover and thoroughly rinsed away surface dust and build up ensuring not to direct pressured water at sensitive components such as electrics. APC was applied to engine plastics and the channels running around the engine compartment before giving an agitation with a detailing brush. The door shuts were also cleansed with APC and rinsed along with the frontal storage compartment surrounds and scuttle panel. A thorough rinse of all bodywork followed by an application of foam prewash to aid in the breakdown and removal of loose surface dirt. The aim of removing as much loose contamination as possible is to minimise the risk of scratching the paintwork during any physical processes, such as the bucket wash which followed to gently remove the more stubborn build up from the vehicles use. As the Porsche was covered in a full body paint protection film (PPF)(apart from the rear bumper and engine cover) as well as many vinyl graphics it would need to be pressure rinsed and washed with extra care as not to lift any edges.


With the bodywork washed safely, attention was turned to the chemical decontamination where a dedicated tar remover took care of the tar spotting before a thorough rinse of any residues, and a dedicated iron remover for any metallic fillings that can corrode within the paint surface if left untreated. The iron remover will indicate any fillings present by means of a purple change in colour where the chemicals are working to breakdown the particles during its working time of approximately ten minutes before a very thorough rinse of all surfaces paying particular attention to areas were residue can collect. The third and final decontamination stage is a physical process where a surface preparation towel (clay bar alternative) is used to remove bonded contaminants that the previous wash and chemical treatments couldn’t remove, ensuring a clean and smooth surface ahead of any machine polishing. A second layer of foam was applied to the car in order to remove remaining residues prior to another final rinse.


Bringing the Porsche indoors to be dried, a premium drying towel combined with warm filtered air to blow out trapped water from door shuts, badges, grills and engine compartment was used before being maneuverer onto our lift in order to begin preparations for its Gyeon Quartz ceramic coatings. Firstly, we set about removing the delicate centre lock wheels so they could be sent to our good friends at Flat Out Alloys where the wheels would be changed from a gloss black with a machined lip to a straight satin black to bring the appearance of the car up to date with Porsche's current spec options. After the wheels were removed, we then further cleansed any areas of the under-arches that we could not access with the wheels in place. This was done using APC and steam for a thorough cleanse of textured surfaces as well as tighter spaces.


The brake callipers were also steamed to breakdown brake dust and any grease substances before inspection the callipers for chips or damage of the finish – the owner asked us to touch up a few visible chips on the callipers, but upon further examination the damage was too heavy for a simple touch up.


It was decided that the callipers would be refinished to ensure the very best as-new look. Porsche ‘Guards Red’ was the colour chosen alongside a replacement white decal to sustain the factory spec of the car. We meticulously masked up all exposed components and paintwork to prevent any overspray before beginning to prepare the callipers for re-paint. The callipers were then rubbed down and degreased prior to receiving its primer, base (colour – Porsche Guards Red), and clear coat layers. The replacement Porsche decals were installed between the base and clear coat layers to ensure that dirt cannot become trapped around the edges of the decal once the car is back on the road. We gave the centre of the brake disks a few coats of satin black for a cleaner look once the wheels return.


We also notices that the mesh nose grills were chipped and tarnished, so these were given a coat of satin black too.


The owner, being a very particular gentleman in regards to his vehicles, also mentioned about carrying out some interior work. Although on the appearance of it, the interior looked to be in very good shape with the leather showing no excess glossiness and minimal debris throughout the cabin. We were told that whilst the interior has a regular vacuum and dusting, it has not been given a deep cleanse for quite some time so we decided it would be added onto the job list so that the vehicle gets fully cleansed from top to tyres. Staring the interior with a thorough vacuum to remove any loose dust and debris from all surfaces, both an airline and detailing brush was used to ensure the hard to reach and intricate areas were cleared of the finest dust where a microfiber (or our fingers) could not reach. Beginning with the rear area where you would normally find a pair of seats, the carpets were given a misting of a diluted interior cleaner and massaged into the fibres before a gentle scrub with an upholstery brush. A microfiber towel and a bucket of warm water were used to collect any dirt trapped in the carpets fibres, with the microfiber being rinsed in the warm water after wiping down a section. After a few sections, the water began to darken as the dirt collected by the towel was released into the bucket (much like the two bucket method used for the exterior wash process, of course this just required a change of water after each area was completed). This process continued for the remaining front carpets alongside the floor mats and the alcantara seat padding, which were removed from the car prior to cleaning. The leather seats, dashboard and interior door trim were cleansed also to restore the factory matte finish safely ahead of the protection being applied.


We used Q2LeatherShield on all interior leather surfaces including seats, door trim and dashboard sections to provide protection against spills, excess denim dye transfer and also UV protection which can cause fading. All interior fabrics (once bone dry) were given an application of Q2FabricCoat, a dedicated textile protector from Gyeon Quartz. This included the floor mats, alcantara seat inserts and full rear carpeted areas behind the seats. The carbon fibre seat rears were found to have holograms present, so we decided to quickly machine polish where we could to remove said holograms to reveal the glorious carbon weave. A buff over of the interior glass and another area of the Porsche was completed.


At this point the ‘dirty work’ was completed which meant we could move onto the polishing process. As mentioned earlier the entire vehicle is covered with paint protection film which means that we cannot polish aggressively without compromising the surface of the film itself. Instead, we chose a light finishing polish to gently improve the gloss, the rear areas that were not protected with PPF had very minor marring present which the polish chosen was able to remove adequately. We paid great attention to edges where polish residues could become trapped, taping off vulnerable risks. The rear wing was also removed from the car entirely to gain access to the underside of the wing and the underlying engine scoop area. To remove any remaining polishing oils a dedicated panel wipe was used, Q2Prep, in readiness for the vehicle to receive its professional grade ceramic coating. The panel wipe is a very important part of the process when installing a ceramic coating, as any oils or residues can have the potential to cause smears, patchiness and even reduced performance/durability.


Whilst we were carrying out the polishing, we asked our friends at Swish Graphics to supply and install a replacement 'N' from the incomplete Bilstein decal on the front bumper.


The ceramic coating chosen for this vehicle is part of Gyeon’s exclusive Certified Detailer range, Q2DuraFlex – a two part construction of Q2Base and Q2Flexi offering five years protection alongside unparalleled gloss and water repellence. Each layer is installed systematically to ensure no smears remain, working manageable sized sections at a time until the whole vehicle has been completed. A four hour window is required between the base layer of Q2Base and the Q2Flexi topcoat, in which time we continued with the other surfaces due to receive their own coatings including the exterior glass. Preparing the glass surface with Q2Cleanse to remove water spotting and any remains of previous glass treatments, Q2View was then applied in order to maximise visibility in wet driving conditions. A single layer of Q2View was applied to the rear three glass panels whilst the front and windscreen panels received two layers to ensure the driving windows offered the best repellancy possible. All exterior plastics were given their own ceramic application including the plastics surrounding the frontal storage compartment, plastic liners within the arches and other trim on the body itself. All of which was treated with Q2Trim, Gyeon’s dedicated plastic preserver which has the ability to restore colour and prevent fading for an approximate twelve months. We removed the exhaust tips from the car to gain better access to the full diameter whilst polishing and protecting. As the exhaust tips are raw rather than a high polished or painted finish, the polish was a non abrasive cleanser style polish to remove surface build up. Once again Q2Prep degrease followed by a Q2Rim protection before refitting them to the car.


After a few days away at our go-to wheel refurbishment company, Flat Out Alloys, the wheels were collected and were now a beautiful satin black finish. The wheels were not curbed or damaged prior to being handed over to Flat Out Alloys, but the owner had decided that he wanted something to change the appearance of the car alongside the large cleaning session it was having with us. The owner had also provided us with four brand new centre locking nuts direct from Porsche at a whopping £200+ per nut! Sadly these nuts are notorious for tarnishing, fading and staining due to their anodized metal finish that is extremely sensitive to chemicals such as acids that commonly get used on wheels ineffectively.


With the wheels back, we degreased the fresh finish with Gyeon’s Q2Prep before applying their dedicated heat resistant ceramic coating, Q2Rim. Q2Rim can be used on gloss, matte and satin finished alloy wheels (or other heat prone components) with no compromise to the finish – gloss wheels become even glossier and matte/satin finishes receive a darkening of the colour with no change in final finish. We also ceramic coated the brand new centre locking nuts to give them a barrier against road salts and any chemicals used in the future, although our client was advices that a pH neutral wheel soap, like Auto Finesse Revolution, would be all that is needed from this point forward.
We then refitted the wheels to the car very carefully, not only did we not want to damage the freshly refurnished wheels, but the freshly painted brake callipers were also prone to being knocked against – not to mention the centre lock shafts that certainly wouldn’t be a cheap thing to replace if any damage was to occur – so a microfiber towel was placed over the caliper to act as a cushion. Our friends at Flat Out Alloys were very kind to allow us to use their commercial torque wrench to secure the wheels, as they require a whopping 600-700nm of force to secure (your normal road wheel requires around 110-120nm for an average car).


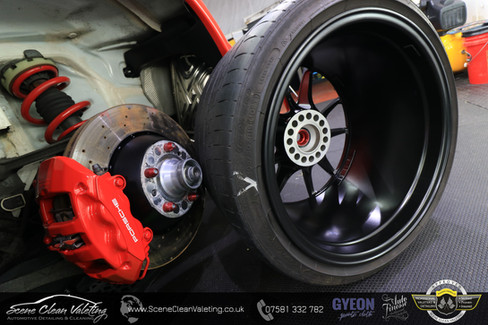

The locking pin was then checked and adjusted to ensure it was in its locked position after tightening the centre nut, which is a device that prevents the centre nut coming loose and resulting in a very bad accident. So we meticulously checked these locking pins were in the correct position before continuing any remaining tasks.


The Porsche dust covers were given a machine polish with Q2Primer and a Rupes iBrid before being degreased of polishing oils with Q2MPrep and protected with Q2Rim ahead of being refitted to the car.

The final areas to take care of were the engine compartment, exterior glass and any last touches needed. Beginning with the engine compartment we applied a liberal misting of Auto Finesse Dressle trim dressing. This was left to dwell for a few minutes before using our air blower to gently blow the excess into all nooks and intricate areas, any runs and patching was then buffed with a microfiber to leave an even finish. Any splatter and spots were carefully buffed off surrounding paint before moving onto cleaning the exterior glass with Q2MGlass, Gyeon’s glass cleaner that will not harm fresh coatings, making it a perfect product for freshly protected glass in need of some minor residue removal. The door shuts were given a final buff with Gyeon’s Q2MCure Si02 maintenance spray in order to add some protection whilst simultaneously removing any light water spotting and dust present.
The licence plates were refitted to the vehicle with new fixings as the ones that were fitted upon the cars delivery were corroded, so we replaced these at this point to complete the Porsche’s six day service.

To conclude the Porsche received the following work over a six day period with the owner giving us a detailed knowledge about his requirements, whilst also providing us with freedom to carry out what we feel would benefit the vehicle:
Full under-arch deep cleanse.
Brake Calliper Refinished in Porsche Guards Red.
Full Interior deep cleanse.
Single stage machine polish to cleanse and boost gloss.
Wheels refinished in Satin Black curtesy of Flat Out Alloys.
Nose grills repainted.
Replacement Centerlock Fixings.
Ceramic coatings to: Bodywork (Q2DuraFlex), Wheels & Exhausts (Q2Rim), Exterior & Arch Plastics (Q2Trim), Exterior Glass (Q2View), Leather (Q2LeatherShield) and interior textiles (Q2FabricCoat).
Overall, a very nice refresh of this maturing Porsche GT3, now set to look almost new again for years to come. The finished piece:


Thank you for reading, Aaron


Comments