

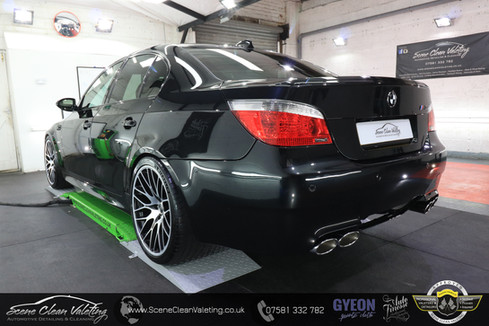
BMW E60 M5 - Enhancement Detail, Gyeon All Surface Ceramic Coating & XPEL Paint Protection Film
- Aug 10, 2019
- 12 min read
The ‘M’ division of BMW have never failed to offer high performance models that often go under the radar to the unsuspecting passer-by, especially in the slightly older generations. As the newer designs have some widened arches, fancy wheels and some pretty special colours its become a little more obvious that the cars are designed to go fast, and go fast well. However, take it back a generation or two and the BMW M cars were a little more discreet, that is until the accelerator pedal is given a full squeeze. The E60 M5 does exactly that. Looks like an ordinary 5 series saloon, but with a whopping 5.0L V10 engine as its heart can cause quite a stir when a high-flying CEO in their brand new Porsche 911 tries to show off at a set of traffic lights. Some have even claimed the E60 M5 has one of BMW’s best ever engines. The BMW M5 in this feature isn’t quite a run-of-the-mill example with a few tasteful modifications such as upgraded alloy wheels, lowered suspension and an Eismann exhaust system – all of which make a normally overlooked model get that second glance it deserves. The owner of this particular M5 scheduled us to carry out a reasonably large transformation including paint correction, full exterior ceramic coatings and even some XPEL Paint Protection Film (PPF) thrown in too. So, lets get started..


Raising the car up with a low-entry trolley jack allowed better access to the under-arches. An all purpose cleaner was liberally sprayed before a long reach brush worked and lifted the build up. A thorough pressure rinse of the arches and suspension components then followed before moving on to the next. Once each corner was complete the car was lowered down carefully from the jack. At this point we would normally have cleaned the wheels also, but as these are scheduled to be removed they would be tackled off the vehicle later.

The engine compartment was given a thorough rinse to clear away surface dust and dirt before using an all purpose cleaner agitated by brush once again to give a deeper clean of plastics, exposed bodywork and other components prior to another rinse and re-agitation in any areas required. The door shuts were misted with a citrus cleaner whilst using a Detail Factory super-soft detailing brush to work the hard to reach areas of dust. A pressure rinse then allowed the lifted dirt alongside harder to reach areas to be blasted away. Each door shut and the boot shut was cleaned in the same manor, ensuring any water overspray was wiped from interior surfaces after rinsing with a microfiber towel.
As the M5 had been delivered direct from the bodyshop, they had already given the car a clean which didn’t leave us much to photograph. We gave the car a thorough rinse with the pressure washer to remove loose dirt and dust from the surface, following with a layer of foam prewash which was left to dwell for a few minutes whilst grills, badges and panel gaps were cleared of trapped dirt with a Detail Factory brush. The foam was then rinsed away before moving on to the bucket wash, adopting a two bucket method alongside a Gyeon Smoothie microfiber wash mitt.


Tar spots were removed with a dedicated tar remover, using a microfiber towel to wipe away excess and softened spots before repeating as necessary over each panel, rinsing as a select few panels were completed. Once all tar, adhesive and glue residues had been removed our attention turned to the fallout contamination; fallout being microscopic particles of metal that embed themselves into the clearcoat of a vehicle and begin to corrode, which is more commonly seen on white vehicles that have not been decontaminated regularly. To treat fallout, a dedicated product is sprayed liberally onto all paint and left to dwell for approximately ten minutes. As the temperatures outdoors was beginning to rise greatly we moved the M5 indoors out of direct sunlight before application. Any metallic particles present would be highlighted by the fallout remover changing colour due to a chemical reaction – a deep purple/red would become visible upon contact with contaminants. Once the product had been given sufficient time to react, the car was moved back outdoors to be given another pressure rinse ensuring to give additional attention to areas where the residues could pool and collect such as wing mirror bases and window seals. To ensure all trapped fallout remover was drained away from water trap areas, a second layer of foam prewash was applied to work its way into these areas and push out any remains.


Once all foam and residue had been rinsed away, the car was moved back indoors for the final time to receive its final decontamination process with a claybar, a physical decontamination that abrades stubborn particles away from the paintwork. This final step ensures the paint is smooth and ready to begin its paint correction once the car had been dried off with a dedicated drying towel alongside warm filtered air and manoeuvred on to our lift. Even though we had undertaken the two chemical decontamination steps before the claybar was used, it was still able to remove further contamination from the exterior of the car.


Now that the vehicle was positioned in the detailing bay, it was raised up on the lift in order to remove the matte finish aftermarket alloy wheels. Using our alignment tools we ensured the wheels did not drop on to the brake calipers once all bolts were removed which could damage both wheel and caliper. The wheels were then taken back out to be given a deep cleanse, starting with a non-acidic wheel cleaner which was agitated by an assortment of wheel brushes and rinsed thoroughly. Covering the wheel in fallout remover, both front and rear, leaving the product for a few minutes to react with any bonded brake dust whilst we continued to clean the next waiting wheel with the same process. The fallout remover was given a gentle but thorough brush using the same assortment of brushes before rinsing the wheel and repeating the application of fallout remover until we were satisfied that no more bonded particles remained. Tar spots and any greasy residues from an oil based tyre dressing were removed along with removing the tyre dressing itself. Another thorough rinse before a final cleanse of the tyres using Gyeon Tyre Cleaner and a stiff bristle scrub brush removed any last traces of previous dressing whilst leaving a good base for the new dressing to come. Once all wheels had been cleaned they were taken inside, dried down and placed to one side before the brake calipers were given a clean to remove brake dust soiling and general build up.


Intricate areas such as rubbers, plastics and various edges were carefully masked off to prevent damage during the machine polishing stages. The engine compartment was covered with plastic sheeting thus to avoid polishing dust build up. The owner requested the original chrome ‘M5’ emblem on the rear bootlid to be removed and replaced with a gloss black alternative from the latest model. We used tape to create a template of placement to ensure the new badge is returned to the original position on the bootlid, which would be essential for a factory-look. For the best finish we would not replace the badge onto the boot until the polishing had been completed, this allows a consistent finish without the need to remove excess polish that may get trapped around the badge. Using some fishing line in a sawing action, the adhesive holding the original badge was separated. The remaining adhesive (along with a lot of old licence plate sticky pads) were soaked in tar remover for a while to soften the adhesives for an easier and hastle-free removal.


Before beginning the polishing, we inspected the panels being worked upon and used a paint thickness gauge to get an estimated depth of paint across multiple points whilst making note of the average thickness on each individual panel. Our client required some dents to be removed from the rear offside arch and two smaller door dings from the nearside. Our dent specialist 'Fix-a-Dent' removed the door dings and improved the severe arch dent to approx 95% - due to the severeness of this one a full repair was not possible.


Using a collection of Rupes dual action polishers the paintwork was removed of swirls and surface defects using an abrasive compound and a Meguiars microfiber cutting pad. This combination offered great levels of cutting ability but subsequently left a haziness to the paint; a higher cutting ability often results in a lesser finish, a higher finishing ability often limits the cutting action. As the BMW was scheduled for an Enhancement Detail, the objective of the service was to improve the condition of the vehicle without necessarily looking for perfection. Aiming for an approximate 75-80% level of correction allows the vehicle to be restored to a very respectable appearance with an increase in depth and clarity. A panel wipe solution was used after each polishing area to reveal any hidden defects that could be hidden under the polishing oils and residues.


Any repeated polishing was then carried out until satisfied to move on to the next section/panel. Once the entire cutting stage had been completed, the M5 was then re-polished with a less abrasive polish/pad combination in order to maximise the paints depth of gloss and clarity by removing the cutting haze currently present. As the removal of swirls and surface defects was carried out with the cutting, the refining stage is purely designed to extract the best finish of the paintwork ahead of the Paint Protection Film and ceramic protection stages.
Our client wanted to preserve the freshly refinished panels from stone chips, road rash and general abrasions through an XPEL Ultimate Plus PPF installation. Our XPEL accredited Paint Protection Film installer travelled to our premises to protect the BMW in the best possible way. We installed XPEL to:
Full Bonnet
Front Bumper
Full Wings
Headlights
Wing Mirrors
A-Pillars & Front of Roof
Full Side Skirts
Rear Bumper Impact Areas
Rear Bumper Top


Our Paint Protection Film specialist, ‘Protect Your Paintwork’, carried out the installation using pre-designed templates which ensure the film is cut via digital computer plotter; this provides a pattern designed specifically for this vehicle for a perfect fitment with no need to trim or cut the film when installed (eliminating the possibility of blade marks on the paint below). The PPF is a wet application were a slip solution allows the film to be manoeuvred into position before the slip solution Is then squeegeed from beneath the film to enforce the adhesive backing to form a strong adhesion to the paint. As the XPEL Ultimate Plus is a self healing product, meaning that minor abrasions and marring will simply fade away with the introduction of heat, any marks the squeegee may leave can easily be removed. Once the film had been installed, any remains from application were then carefully cleaned up with an assortment of panel wipe products and the film was then left overnight to settle before beginning the protection stages. During the time in which the XPEL film was being installed, we turned our attention to the alloy wheels. As they were cleansed earlier in the service all that needed to be done prior to applying the ceramic protection was to degrease the surface of the wheels to ensure a superior bond. To do this we sprayed a generous amount of Q2MPrep on both front and rear of the wheel before using two microfiber towels to ensure a perfect platform for the application of the coating. We chose Gyeon Quartz CanCoat Pro for the wheels, ensuring we split the wheel design into manageable sections for a controlled residue removal until each wheel was complete. Exclusive to Gyeon Certified Detailers, Q2CanCoat Pro is a revised and upgraded version of their Q2CanCoat – but with an even better durability and performance that is ideal for areas prone to a higher build up, such as wheels. One all four wheels were protected Q2Tire was applied to the tyres to give the final touch and then left to cure whilst we returned to the car itself to apply the same Q2CanCoat Pro to the brake calipers, once again ensuring the surface was clean and degreased with Q2MPrep.

The engine compartment was given a liberal covering using a water based dressing, in this case Auto Finesse’s Dressle. Any excess dressing that then landed on the surrounding glass and paint was removed with a panel wipe. As the M5 had opted for our premium ceramic coating upgrade, the paintwork needed to be removed of any polishing oils and residues that accumulated from the engine compartment dressing (even if not visible to the eye) using Q2MPrep. This panel wipe breaks down the remaining impurities to leave a bare and degreased surface in readiness for the ceramic coating to be installed. The choice of coating to be installed to this vehicle was one of Gyeon Quartz’s flagship treatments, Q2DuraFlex – a professional only protection that is exclusive to Gyeon Certified Detailers such as ourselves. This exclusivity offers additional benefits over a consumer grade ceramic coating by offering an increased chemical resistance, increased gloss levels, extended durability and superior water repellency. These attributes are given through a two-layer application where Q2Base provides the foundations and hardness, whilst Q2Flexi offers the water behaviour, gloss and durability. After approximately three and a half hours, both layers of the Q2DuraFlex installation were complete and would require a full twenty-four hours to cure before being exposed to outdoor conditions. In this time period the remaining ceramic coatings were continued in their applications. The exterior glass was polished using a cerium-oxide liquid to cleanse and prepare the surface, removing any previously applied glass treatments that could impair the performance of the new coating being applied. Two layers of Gyeon Quartz Q2View was applied to the windscreen and front door glass whilst a single layer was applied to all other glass surfaces including the wing mirror glass and sunroof. The residue was left to bond onto the glass for a few minutes before buffing with a clean microfiber towel and being left to cure for a few hours prior to giving the glass its final clean. A small amount of Q2Repel was applied to the wiper blades to ensure the longevity of the coating and to prevent any smeary-like issues in the event of the wipers being used.
The BMW had a minimal amount of exterior plastic trim in need of protection, with only the central bumper grill, wing cut out vents and the washer jets being present, Q2Trim was applied to these areas ensuring an even coverage. The honeycomb nose grill was protected by hand using various sized application swabs to allow access into every individual hole – taking approx 30-40 minutes to complete.

Returning to the engine compartment, any remaining drips/smears were wiped away with a microfiber towel to reveal an enhanced appearance to the plastics and rubbers present. Satisfied that the excess had been removed the bonnet was lowered and we then moved on to refitting the alloy wheels using our alloy wheel alignment tool, a must-have tool for the removal and re-fitting of wheels where one slight knock of the wheel onto the caliper (or disk edge) could cause some unsightly damage. The wheels were secured back onto the car, torquing the bolts up as required.

The Eisenmann exhausts were polished to remove emission staining and general build up using a metal polish. The rear exhaust boxes were also given a light polish to restore the clear stainless shine which would be visible by anyone driving directly behind the M5. Removing any residues from the tips using Q2MPrep, the tips were then protected with Q2Rim – Gyeon’s dedicated heat resistant coating designed to aid in cleaning the exhaust tips from this point forward without being damaged with increased temperature fluctuations.

As the exhaust tips were the final area requiring a ceramic application, we allowed the exterior of the car to cure and harden for a few hours (some overnight). During this time the interior was given a thorough vacuum to remove surface dust and debris, using a compressed airline to blow any dust out of inaccessible areas such as switches, seat rails, under seats and so on to ensure no area was left untouched. The interior glass was cleaned of smears and general build up before buffing to a clear with a microfiber. A brush attachment on the vacuum was used to gently agitate any build up from the leather seams whilst they were separated by hand to ensure dust and debris below the surface could be reached. A final wipe down of the interior trim with Auto Finesse Spritz interior quick detailer collected any remaining dust and light surface dirt without adding any greasy or shiny residues. To complete the M5’s substantial overhaul, we removed any dust particles that had settled on the car using a filtered air blower and followed with Gyeon’s Q2MQuick Detailer for a final buff of the car. This ensured the highest level of gloss and slickness was achieved whilst ensuring a smear free finish was presented once buffed thoroughly. The door shuts and under bonnet areas were also wiped free of any water spotting and dust using Q2MQuick Detailer, which added a slickness to help keep make these areas a little easier to clean. The exterior glass was cleaned with Q2MGlass, Gyeon’s coating-safe glass cleaner to remove any final coating residues and dust from the surface. A check with our handheld light for smears and streaks was all that was required to finalize this BMW’s service and allow the time to step back and admire the results achieved over five days worth of labour.


A few close up images of the XPEL Paint Protection Film fitment..


- Aaron


upgrading your car feels awesome and I have a good website for you where you can upgrade your car to a new awesome look.