

Porsche GT3-RS - Gyeon All Surface Protection
- Jan 24, 2020
- 12 min read
Updated: Jan 27, 2020
The Porsche was delivered to us via a covered transport trailer to prevent any potential road damage in its 60 mile journey from Hereford. As the car has previously had a full body paint protection film (PPF) installation, the car was scheduled to receive our premium ceramic coating treatment where all exterior surfaces would receive dedicated Gyeon Quartz products.


Following a weekend of driving in poorer weather the car was covered in a high amount of road salt and soiling that would need to be thoroughly cleaned away ahead of any protection stages. Using a low entry trolley jack to raise the car slightly we were given better access to the under-arch areas where an all-purpose cleaner was agitated with a long reach brush. Any lifted dirt was rinsed away with a pressure washer before moving on to the next, this repeated until all four arches were cleaned and the car was carefully lowered from the jack. We would normally look to clean the wheels at this early stage but as the wheels were going to be removed later they will be cleaned a little later.

To begin the cleansing of the body the door shuts, engine compartment (what there is of one) and the front storage compartment were sprayed with a citrus cleaner and a super-soft Detail Factory brush to work any intricate gaps and edges before pressure rinsing each area carefully. The same citrus cleaner was the sprayed onto the bodywork itself to pre-soak the soiling. After approximately 3-4 minutes the car are given a thorough pressure rinse ensuring to remove as much build up as possible without physically touching the surfaces. This alone allowed the majority of the present dirt to be removed without too much difficulty. The door shuts, engine compartment and the frontal area surrounding the storage compartment were also cleaned with the citrus cleaner and a detailing brush before being pressure rinsed.


A layer of foam pre-wash was then applied to the entire vehicle and left to dwell on the surfaces for a few minutes, within this time a soft detailing brush was used to agitate any hard to reach areas such as panel gaps, grills, window seals and so on.


Another thorough pressure rinse followed to remove the foam remains before the car was washed using a two bucket method to greatly reduce the potential of causing swirls or damage to the PPF through cross contamination of grit particles. Beginning at the upper panels of the vehicle the vehicle was thoroughly but gently washed, this time physically with a wash mitt ensuring that the mitts traveled in straight lines using minimal pressure – once again in aid of reducing any risk of imparted damage. After a select number of panels were washed they were then rinsed with the pressure washer before continuing with the remaining areas until the full wash process had been completed in the same way.


Once the pre-wash and physical wash processes were complete it was time to move onto the chemical decontamination to remove tar spotting and fallout from the surface of the PPF. A solvent based tar remover was liberally sprayed onto a panel at a time and given approximately 30 seconds to soften any tar deposits, larger spots could be seen to begin streaking as the solvent worked. A clean microfiber towel was used to wipe over the panel to lift and collect any tar deposits before a second application of tar remover was carried out for any remaining or stubborn spots. Each panel was once again rinsed thoroughly after being treated for tar spotting. After the entire vehicle was removed of tar and sticky residues a dedicated fallout remover was sprayed over the vehicle through a handheld pump sprayer. The purpose of the fallout remover is to chemically break down any metallic particles that embed themselves in to exterior surfaces and then begin to corrode over time. Approximately 10 minutes was given to allow the product to sit on the surfaces and begin the process of breaking down any metallic particles present, with the product turning deep purple in colour when contact was made with ferrous contamination.

Happily the Porsche was not excessively contaminated with the product highlighting a minimal amount of chemical reactions across the majority of the car. Normally a vehicle would then move onto a third and final decontamination step following the fallout remover, but as we did not want to add any marring or marks to the PPF we decided the little amount of fallout shown by the chemical treatment was sufficient to avoid using a clay bar; whilst the PPF installed upon the GT3-RS is a self-healing type, we did not want to impart any unnecessary defects which would need more time to heat treat later in the service.


The Porsche was moved into the unit and dried down using a combination of drying towels and our BigBoi Blo-R Pro touch-less dryer to blow trapped water from grills, badges, door shuts and other areas that are normally seen to drip for hours after a wash. The car was then moved into the detailing area and positioned on our scissor lift to raise the car slightly off the floor.
The centerlock alloy wheels were loosened off using the special removal tool (located under the front scuttle panel if you have a Porsche with C.L. alloy wheels) and a large commercial torque wrench. At 600nm the centerlocking nuts are on very tightly to withstand the stresses caused through driving the vehicle - as an indication of how tight these types of wheel fitting are, a Bentley Bentayga 4x4 only requires 130nm on its wheel bolts.
After removing the wheels carefully, ensuring not to knock the wheel onto either the PCCB callipers or PCCB disks, they were placed to one side to have the rear mounting faces masked up to prevent any water contacting this area during the cleaning process. Taking the wheels back outside two at a time, they were given an initial pressure rinse to remove the loose dirt and debris. A fallout remover was then liberally sprayed onto both the wheels face and rear barrels and left for a few minutes. As ceramic brakes produce little-to-no brake dust, we weren’t expecting the wheels to show much reaction but it is good practice to use it to ensure the wheels are still given a good chemical decontamination ahead of being ceramic coated. A boars hair detailing brush was used to agitate the fallout remover to ensure all areas of the wheels were lifted of surface soiling before a thorough rinse once again. Tar spots were then taken care of in the same process used on the bodywork, with a generous amount of product and a microfiber towel. The tyre side wall was then finally sprayed with Gyeon Quartz Tire Cleaner and scrubbed with a stiff bristle brush to cleanse the tyre free of any old tyre dressings and brown staining. A final rinse before the wheel was taken back inside and dried using the Blo-R Pro. Once each wheel was dried they were then degreased of any remaining water droplets and residues with Gyeon Prep, a dedicated panel wipe.


A boars hair detailing brush was used to agitate the fallout remover to ensure all areas of the wheels were lifted of surface soiling before a thorough rinse once again. Tar spots were then taken care of in the same process used on the bodywork, with a generous amount of product and a microfiber towel. The tyre side wall was then finally sprayed with Gyeon Quartz Tire Cleaner and scrubbed with a stiff bristle brush to cleanse the tyre free of any old tyre dressings and brown staining. A final rinse before the wheel was taken back inside and dried using the Blo-R Pro. Once each wheel was dried they were then degreased of any remaining water droplets and residues with Gyeon Prep, a dedicated panel wipe.

Working on each wheel individually, they were placed onto our wheel stand in order to be ceramic coated with Gyeon Q2CanCoat Pro. The wheel stand is designed to keep the wheel upright whilst being able to fully rotate it during the application – making any missed spots easier to see. Using three brand new microfiber towels and four cut-off pieces of microfiber to apply, the Q2CanCoat Pro was applied to the full face, rear barrel, spoke backs and the centerlock retaining nut using one of the microfiber cut off pieces per wheel. One microfiber towel was then used to remove the bulk excess of the coating, whilst the second and third buffed the remaining smears away to leave no high spots or smudges. Using a diffused LED panel light each wheel was rotated and checked for any final buffing required before moving on to the next. Tyre dressing would be done later on in the detail once the wheels were refitted to the car.


The brake callipers were cleaned off using a citrus cleaner and a couple of microfiber towels to wipe away dirt and general soiling, whilst a second microfiber was then used to buff away any residues. Gyeon Prep panel wipe was then used to degrease the surface of the calliper ahead of the Q2CanCoat Pro being installed. The central bells of the PCCB disks were also coated to offer a darkened depth of colour.


With the wheels taken care of, we turned our attention to the interior of the car, more specifically the dark tints that had been fitted to the rear three polycarbonate windows by the cars previous owner. To be able to remove the tints access was required, and of course, being a Porsche GT3-RS the one thing that you don’t get much of for your money is access to the rear due to the non-folding front seats as well as the huge roll cage. Carefully squeezing past the seats, we managed to get far enough into the rear of the car to begin removing the film, starting with finding an edge and lifting it away from the window. Once a tab had been lifted the remaining sheet of tinting film removed effortlessly, with minimal glue residue to remove other than the very edge of the window. A little tar and glue remover on a microfiber towel broke down the residue before Gyeon Glass glass cleaner was used to clean the internal rear glass (as once we were out, we weren’t squeezing back in!).
The interior was vacuumed thoroughly, including using an airline to blow out any trapped dust from vents, switchgear, under the seats and so on. A secondary vacuum was then carried out with the rear section of the interior requiring a long reach extension to reach through the roll cage. The dashboard and door trim was wiped down for dust with a clean microfiber towel misted with an interior cleaner to ensure that the dashboard finish was not turned shiny or greasy whilst simultaneously removing any light surface soiling that could have accumulated over time. The front three driving glass surfaces were then cleaned with Gyeon Glass. The front storage compartment was vacuumed also. The reason for completing the interior at this point in the detail is so that any dust and debris that is blown out of the car by the airline can be safely removed before any final stages are carried out on the exterior.
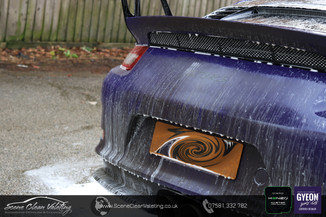
The owner of the car had supplied a ‘PORSCHE’ decal to be fitted on the topside of the rear wing. We prepared the surface by removing mild water spotting using white vinegar (yes, really) before a dedicated panel wipe to ensure the best adhesion possible. Measuring the centre point of the wing’s depth and width we placed the central point of the decal in the centre of the wing and checked the alignment. If any adjustments were needed they were made before temporarily securing the decal in place with some tape. To fit the decal we misted some soapy water onto the wing before peeling the sticker base layer back, this allows the decal to be adjusted if the alignment shifts during the unpealing. Once the backing had been removed fully and the position was correct, the decal was pressed into place using a squeegee, pushing both air and water from beneath the decal. The decal was then left for a few hours before removing the topsheet and leaving the decals adhesive to settle further.


Turning our attention to the bodywork of the car, we noticed that the plastic trim had white polish staining in various places. Before beginning any preparations on the bodywork itself these stains were removed using some all-purpose cleaner and a magic sponge, ensuring all paint/PPF areas were masked off to prevent the abrasive sponge marring or damaging the surrounding areas.


The upright wing supports also had polish staining present on the lower area where they secure to the engine cover, so it was decided to remove the wing from the car – as we would be looking to polish the underside of the wing as well as ceramic coat it later on it would be the easiest solution to carry out the three tasks. Once the wing was removed from both the vehicle and then the upright legs it was carefully placed onto a panel stand.

As the paint protection film (PPF) didn’t require any mechanical machine polishing, we carried out a chemical preparation prior to its ceramic coating. Using the Blo-R Pro the car was cleared of any standing dust and the entire vehicle was then wiped down using Envy Car Care Filler Killer to remove any residues remaining from the wash process and overspray that may have come from other products being used around the vehicle up to this point. White Vinegar was used with a microfiber towel to remove any light water spots from the surface of the PPF. After treating each panel (and polycarbonate rear windows) twice and buffing any wet residues away the car was then given a liberal misting of Gyeon Prep to ensure that the panels were thoroughly cleansed and ready to accept its certified detailer ceramic coating, Q2MOHS+.
Gyeon Q2MOHS+ is our flagship ceramic coating where water repellancy, chemical resistance, ease of cleaning and gloss retention are provided for a five year limited period. This treatment is exclusive to Gyeon Certified Detailers and must is installed through a two-part application; Q2Base providing the foundation layer whilst the Q2Phobic topcoat provided the maximized durability, gloss and hardness. The application of both layers can take between 3-4 hours on a typical sized car dependent on the complexity of the bodywork design. The coating was then left overnight to cure, although a full curing would not take place until 24hrs after the final section was coated with the final layer.
Plastic trim such as the front & rear splitters, scuttle panel wing mirror bases and the air intakes were protected with Q2Trim to restore an enhanced factory depth of colour whilst simultaneously providing a strong hydrophobic layer that will help prevent the trim fading from UV damage for approximately 12 months or more. The plastic engine cover and filler caps were also protected with Q2Trim whilst the plastics that surrounded the front storage compartment were protected with Q2Preserve.


The windscreen and door glass panels were lightly cleaned before CarPro CeriGlass was used via a dual action machine polisher to cleanse and prepare the surfaces for a new glass coating. CeriGlass not only removes surface etchings but will also remove previously applied glass treatments to ensure the Gyeon Q2View application forms the greatest bond and therefore offers the greatest performance. After polishing the CeriGlass was wiped away with a damp microfiber towel and the glass was then buffed until totally dry. Two layers of Q2Repel were applied to the three pieces of glass and buffed off after a few short minutes. A small amount of Q2Repel was added to the windscreen wiper blades to help the longevity of the product. As the rear windows were polycarbonate rather than glass, we decided to use Q2CanCoat Pro in replacement of the Q2Repel. This is due to the Q2CanCoat Pro offering a greater bond onto the surface of the windows and we only really are looking to achieve long lasting water repellence on these windows.
After approximately 12 hours, the car was blown down for standing dust and given a final buff using Gyeon Q2MCure to complete the Q2MOHS+ application. The purpose of the Cure is to act as a sacrificial layer to protect the Q2MOHS+ during its two week full curing process by adding a slick and water repellent layer on the surface. Whilst the initial curing process is 24hrs, in which time the car should not be exposed to the outdoors, full hardness will take place over a period of up to two weeks and is where the Cure spray comes in.
Auto Finesse Dressle was misted liberally onto a microfiber towel and used to dress the plastic arch liners and provide a darkened but natural appearance.


The centerlock alloy wheels were then carefully mounted onto the centre hub spindle and the locking nut was tightened by hand. To tighten the wheels to their 600Nm torque, we firmly pressed down on the brake pedal with the vehicles wheels still off the floor and then secured the pedal down using a tool normally used when a vehicle has its tracking adjusted. Once enough pressure was applied to the brake pedal it would prevent the wheels from rotating whilst being tightened to the 600Nm required. Once the desired tightness had been achieved it is absolutely essential that the locking pin in the very centre of the centrelocking ring is positioned flush and not depressed in. This is due to the locking pin being the built in safety feature that prevents the central nut from loosening itself through vibrations or incorrect amount of torque tightness which could result of course in the wheel working itself loose (or in the worst case, falling off entirely). The tool used to leaver off the center cap can be used to ensure the locking pin is adjusted into the ‘locked’ position if it does not automatically after tightening the wheels. The centre cap was then lined up with the indentations and pushed firmly into place and the tyres were dressed with Gyeon Tire.

The Porsche was then lowered down off of the scissor lift and the door shuts were cleared of any water spots and dust with a wipe with Cure to add some protection to these areas in a quick and easy way alongside the exterior glass being given a final clean using Gyeon Glass to remove any final residues, fingerprints and dust. The rear wing was refitted to the engine cover to complete the job.


Just as it was delivered, the GT3-RS was loaded back on to an enclosed transport trailer in readiness for its 1.5hr, 60 mile journey back to its owner without undoing all the hard work carried out over a 3-4 day period.


- Aaron


If you wanna get the best jeep models, the best way is to get it from here.