

Audi RS4 Avant - Gyeon Quartz All Surface Treatment
- Sep 7, 2018
- 10 min read
As life goes on it various commitments may influence the type of vehicle a person will buy. Sadly, the dream of owning a Porsche 911 or Ferrari may fall short due to lifestyle changes or a growing family which can force the need of something a bit more roomy. The obvious choice of vehicle is an estate car where the larger boot can easily carry golf clubs or even a bicycle on weekends (for those with an active lifestyle), whilst still being capable of doing the school run through the week days. Unfortunately this is never normally an attribute that is associated with performance vehicles with brute-force and pedigree, but there was one estate that decided enough is enough and that it was time to narrow the gap between performance and lifestyle markets - that estate was of course the Audi RS4 Avant. Previously available in both saloon and estate variations, the RS4 is now an estate-only option and offers just as much (or more) grunt than even the most purpose built sports cars.
The RS4 Avant we have in this feature is the latest model, freshly released for 2018 and finished in the ever popular 'Nardo Grey' with contrasting gloss black trim. Recently purchased by its owner and only a shave under 800miles clocked up this fast estate was brought to us in order to gain the best start to its life through our Gyeon Quartz Certified Detailer treatment. The vehicle arrived to us in a very clean state with surface dust in places and a few light bug remains.


With the wheels cleaned and rinsed individually and the arches agitated with a long reach brush, the Audi received its initial pressure rinse where the aim was to remove as much loose debris and grit as possible to reduce the potential for swirls and scratches to occur during the wash process. A layer of Q2MFoam was then applied to the entire car via a foam lance attachment of our pressure washer and was left to dwell on the surface for a few minutes to allow the product to soften and lift any surface soiling that wasn't rinsed away initially.


Whilst the foam was dwelling, we used an all-purpose cleaner (APC) in a trigger bottle alongside a detailing brush to agitate intricate areas such as the nose grills, badges and window seals. A pressure rinse followed once again to remove the remaining foam alongside any lifted soiling, again in aid of safer physical washing. Two buckets were filled with fresh water, one would be left as just water whilst the other would be our wash solution with a pump of Auto Finesse Lather. A grit guard was placed into the bottom of each bucket at this point also.
Washing from top-to-bottom, the RS4 was carefully removed of any remaining road soiling with a lambswool washmitt using straight lines and no pressure. After each section/panel was gently washed, the washmitt was dipped and shaken in the rinse bucket which contained only clean water before re-submerging into the wash solution. This method, commonly called the 'two bucket method', ensures that the majority of the soiling, grit and grime is released from the washmitt into rinse- bucket only. This allows the wash bucket (containing the wash solution) to remain clean and grit free throughout the entire wash process. Pressure rinsing the panels once they have been washed in order to prevent the suds drying out, the steps were then repeated until the entire vehicle had been safely washed down.
Before the car can be machine polished, first it must undergo a decontamination to ensure that the paint surface is as clean as possible. To do this we begin by removing any tar and adhesive from the paintwork using a dedicated solvent which was sprayed generously onto one panel at a time whilst a clean microfiber was used to massage away any softened spots. If necessary this was repeated until all the spots had been removed before moving onto the next panel. Once a group of panels had been treated (i.e. one side) they were then given a thorough rinse. Once again this process continued until the entire car was treated and rinsed. The second step in the decontamination stages was to chemically remove any ferrous particles that bond to the paintwork overtime. This type of contamination, called fallout, is microscopic particles that are airbourne and due to their sharpness embed themselves into the paint surface and eventually begin to corrode; white cars highlight this problem better than others where orange spots can begin to accumulate and worsen if left untreated. Gyeon Q2MIron (a dedicated fallout remover) was sprayed liberally over all exterior surfaces including paint, glass and plastics before leaving it to dwell for up to ten minutes in which time the product would create a chemical reaction if coming into contact with any ferrous particles. This chemical reaction causes a change in colour, in this case a deep shade of purple.


Rinsing away the product after it had dwelled, the third and final step in the decontamination process was to use a surface preparation towel (claybar alternative) to physically abrade any remaining surface contaminants to ensure a thoroughly clean paint surface. Once done the RS4 then received a second covering with a more diluted concentration of foam pre-wash in order to carry lifted contamination away whilst working any trapped product out of intricate areas such as badges and trim gaps.


A final thorough pressure rinse then completed the Audi's wash and decontamination steps and was ready to be brought into our studio and be dried down using a combination of drying towel and warm filtered air. As like all our larger services, the RS4 was then maneuvered onto our scissor lift in order for us to remove the wheels using specialized tools to prevent the wheel dropping and potentially damaging the wheel, caliper or surrounding components during this step. Once removed, the wheels were then taken back outside in order to cleanse any areas that may have evaded our first cleaning attempt whilst fitted to the vehicle, at this point any dirty drips caused by the wet brake disks could also be cleaned away. Any tar spots were removed with a dedicated tar remover at this point before the wheel was rinsed thoroughly and blown dry.


To finish the cleansing process of the wheel they were then given a liberal spray of Gyeon Q2MPrep, a dedicated panel wipe designed to remove any traces of oils prior to a ceramic coating application. Each wheel was carefully degreased and were then set aside until we come back to them later on in the detail.

At this point, the Audi was ready to begin the machine polishing stage of its Single Stage Detail, although firstly we removed the rear Audi rings emblem along with the RS4 badge as the owner supplied us with some gloss black replacements to be fitted.


The audi was inspected for any factory defects that may have occured during the manufacture and transportation processes, gladly we found minimal issues to rectify other than the gloss black trims being hologrammed or lightly swirled. We also found an area of holograms on the driver side rear door which would need to be rectified..


We carried out a single stage machine polish using Gyeon Q2MPrimer on the 'Nardo Grey' painted surfaces to boost gloss and remove the finest of surface marring accumulated in the 700 miles of use since collection from the dealership; Q2MPrimer also prepares the paint through leaving a perfect surface for a Si02 coating to bond. The gloss black trim received an additional polishing step in which a more abrasive polish and pad combination was used to remove slightly harsher marks, these areas were then also polished using Q2MPrimer. We chose our Rupes Bigfoot dual action polishers to achieve the defect removal and final finish required.
As the car will be coated on top of Q2MPrimer immediately after polishing, a Q2MPrep degrease must be performed after a minimum of fifteen minutes to remove any remaining oils; Q2MPrimer can be coated on top of with no Q2MPrep wipe down if left 24hrs after polishing.
We began installing the professional-only ceramic coating, Q2MOHS+, with the first of two layers. The base layer, called Q2Base, lays a thick and hard wearing layer that provides the foundations of the five-year certified treatment. We installed the coating onto one panel at a time whilst splitting larger panels such as the bonnet and roof into smaller manageable sections. Multiple brand new microfibers towels were used to buff away the residue ensuring that no smears, high spots or streaks remained and a handheld sun-imitation light was used to re-check the areas before moving on. This process continued until all panels and gloss black trim sections were treated with the Q2Base. A four hour intermission is required at this point before the second layer of the Q2MOHS+ system can be applied. In which tim we continued with the other surfaces.
Turning our attention back to the alloy wheels, a thick layer of Q2RIM was applied to all areas of the wheels design including the faces, barrels and rear of the spokes. Applying the product to the entire wheel before buffing provided enough time for the heat resistant coating to gain a strong bond with the wheels paint surface. Brand new microfibers are always used to buff away a ceramic coating, ensure that every bit of excess was wiped away. Using multiple light sources provides a great indication of areas than need additional wiping. The gloss red brake calipers received a Q2MPrep wipe down and were then also treated with Q2RIM for super easy future cleaning (as these big brakes create lots brake dust!). The tyres were dressed with Gyeon's Q2MTire, our favorite long-lasting tyre dressing.


We then safely and securely re-fitted the wheels to the car, ensuring that the wheel bolts were torqued correctly before continuing our way through our All Surface Treatment. The next surface to prepare and protect was the exterior plastic trims using Q2Trim to preserve the brand new plastics and add a super hydrophobic layer that not only aids in keeping the plastics clean but also prevents them prematurely fading without the need for regular trim gels or additives. The under-bonnet scuttle panel, mirror bases and even the smaller details such as the plastic wheel bolt covers were protected with the dedicated plastic coating.


The final surface to protect before the second layer of the Q2MOHS+ was the exterior glass which includes the large sunroof. Firstly, all exterior glass requires a thorough polish with Q2MCleanse which is designed to cleanse the glass surfaces by removing any oils, water spots and previously installed glass treatments to ensure the very best bond onto the glass itself. A damp microfiber removed the residue of the Q2MCleanse and once the glass was totally dry, a thick layer of Q2Repel was applied. The front windscreen and front side door glass panels received two applications of Q2Repel whilst the remaining glass panels were treated with a single layer (due to the wipers and front glass seals physically contacting these areas whilst in operation). A few minutes were given to allow the coating to haze before a thorough buff of all treated glass (incl wing mirrors).
We then turned our attention back to the bodywork as the four hour intermission has passed by this point. We took some fresh brand new microfiber towels and picked up Q2Phobic which is the second and final layer of the Q2MOHS+ installation. Applying in the same manor as Q2Base the Q2Phobic was applied to only one panel at a time, although some section sizes were reduced to make the buffing step more manageable - as this product requires a precise buff to remove all traces of smears. A handheld light source ensured a perfectly buffed surface and we moved onto the next. Once all sections had been complete, it was time to begin the force curing of all the Q2 coatings installed. Although the coatings are naturally cured 24hrs after application, to acheive the best performance and durability an IR lamp is an alternative method. Not only does it help performance and durability, but it also speeds up the curing process to ten minutes per panel/section when baked between 45-55 degrees. We decided to fit the gloss black badges at this moment, as the coating it at its least-slick state and the additional heat provided by the IR lamps will aid in proper adhesion of the badges. Following our measurements, we carefully installed the new gloss black badges.


As you can see from the image of the badge, the red decal section of the 'R' was more of a dull and pinky colour instead of a bright vibrant red like that of the original. Not only that but the surface of the decal had already began to lift from the clear adhesive mounting paper so it was decided to replace the decal for some fresh gloss red. Our friends at Swish Graphics trimmed the new piece and installed it ready for the car to receive its final wipe over with Gyeon Q2MCure.


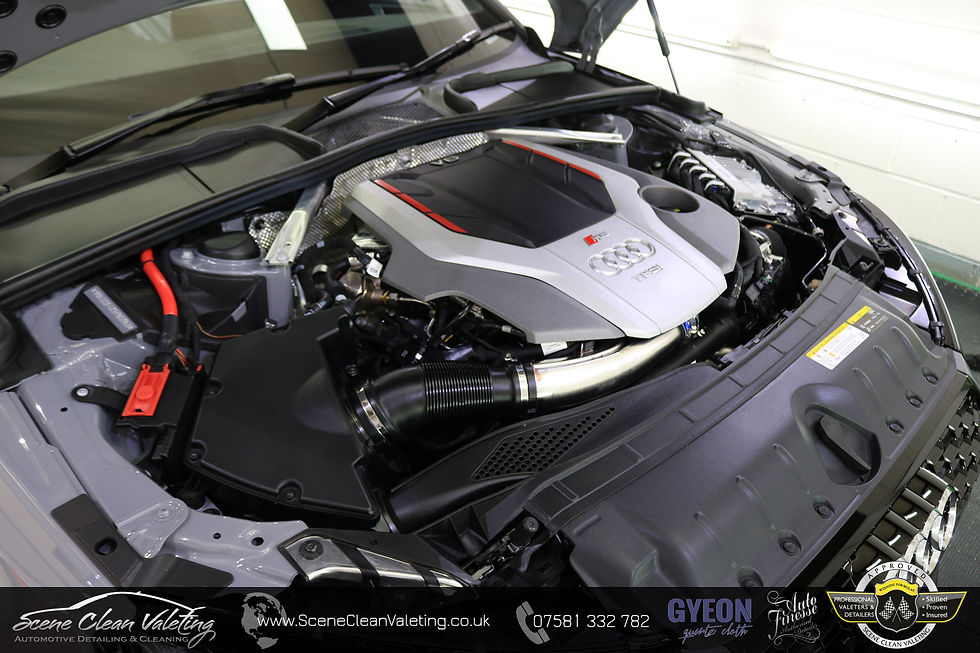
Q2MCure is a product that is designed to add a layer of protection onto the ceramic coating to aid in the prevention of waterspots within the first seven days after the coating is completed; although we force cured the coatings enough for the vehicle to be used, the coatings don't reach full hardness until an approximate seven days after installation. For this reason a ceramic coating should not be washed with any detergents or strong chemicals in the first seven days. The door shuts were protected with Q2MCure and the engine compartment was dressed with a generous application of Auto Finesse Dressle before the excess was wiped up with a clean microfiber to leave a clean over-satin look that compliments the exterior of the car perfectly. Finally on the exterior, the glass was buffed to a smear free finish using Gyeons Q2MGlass.
The last area of the Audi's detail was to get the interior protected. The owner was looking to gain the best protection possible so it was decided that Gyeon Q2LeatherShield would be the direction to go. A thorough vacuum of all interior surfaces removed light surface crumbs and dust, a dedicated interior brush was used to ensure switch gear and intricate areas were also cleared of debris. The floormats were removed from the car and given a liberal application of Gyeon Q2FabricCoat wish was then massaged into all fibers using a gloved hand. The leather upholstery was thoroughly vacuumed ensuring that the seems were separated to gain access to all particles that could potentially damage the surface of the leather. All leather surfaces including the steering wheel, gear selector and door grab handles were given a light surface cleanse using Q2MLeatherCleaner and a microfiber towel to remove anything that ma have been collected within the 700 miles since it was collected from the dealership. It also ensures that the leather is thoroughly clean ready for the Q2LeatherShield to gain maximum bond. Once the leather had dried off completely, a thick layer of Q2LeatherShield was applied to all leather, once again including the steering wheel, door handles and any other trim pieces we could find. Once applied and leveled correctly, the product would cure and return to a beautiful matte finish which can provide protection against spillages, denim transfer and excess soiling for an approximate twelve months. Any plastic trim surfaces were wiped over with Auto Finesse Spritz to add an anti-static protection without changing the new trim appearance, all interior glass was then cleared of smudges and streaks using Auto Finesse Crystal to complete the service. After three days of work, it was time to sit back and admire the finished article..


- Aaron


Comments