

Maserati GranTurismo Sport - Gyeon All Surface Protection
- Jul 10, 2018
- 9 min read
Italian cars always have the flair, style and presence to turn heads even when standing still. Although one driving down the road with a hearty V8 engine is guaranteed to turn emotions too (well, for us car nuts at least). Luckily enough, the naturally aspirated V8 engines can still be found in Maserati's GranTurismo until environmental legislation will likely see the introduction of smaller engines with some turbocharges bolted to it. So for the time being, Maserati are having maybe a final hoorah with this model before things may need to change to keep with the times. The latest GranTurismo, which we have in this feature, uses a revised version of the 4.7L Ferrari/Maserati engine that produces 454bhp, so it's certainly no slouch for what is a comfort cruiser and not a thoroughbred.
The brand new GranTurismo Sport in this feature, finished in 'Grigio Granito', was booked in with us to have our full Gyeon Quartz treatment which would protect every surface both on the interior and exterior with the most durable products we can provide. First however, the car needed to be collected as the owner of the vehicle was away with work commitments. The owner asked us to collect the vehicle from his home address in order to carry out the work in his absence and thanks to our fully comprehensive motor trade insurance, we collected the Maserati and drove it back to our premises to carry out our service as planned. Back at our studio, we got to work..


The satin black wheels were sprayed with Gyeon Q2MIron, a dedicated fallout remover, and left to dwell for a few minutes. We then pressure rinsed each wheel and arch individually to remove most of the brake dust and road soiling. The Maserati was in such a clean condition when we collected it that the wheels needed minimal time to remove any remaining soiling. Auto Finesse Revolution wheel soap was used alongside a miniature lambs wool wash mitt and assorted brushes dedicated to use on wheels only. A long reach brush agitated road build up from the arch liners before rinsing thoroughly along with the wheel. This process repeated for each wheel until all four were complete. The engine compartment is also included as part of any Detailing Service, where surface dust and light residues will be removed to restore the engine bay back to a more-than presentable condition (after all, who wants a beautiful shiny car with a grubby engine compartment?). A diluted all purpose cleaner (APC) was sprayed onto each surface and worked using a boars hair detailing brush to dislodge dust and particles. A careful but thorough pressure rinse cleared away the residue.


Once the engine compartment was rinsed we then turned attention to the bodywork. Beginning with a thorough pressure rinse to remove any loose surface dust and grit. As the Gran Turismo was in such a clean state, we could have jumped straight to the bucket wash after the pressure rinse, but for peace of mind we covered the car in a layer of Q2MFoam pre-wash. The purpose of the pre-wash would be to help breakdown any surface soiling that may be present, even if we cannot see it, making the bucket wash safer by lifting grit particles from the paintwork. A detailing brush was used to agitate badges and intricate ares free of any dust and build up whilst the foam was dwelling.


Another thorough rinse of the remaining foam and the Maserati was given its bucket wash, of course adopting the two bucket method with grit guards thrown in too. A CarPro lambswool washmitt ensured the paint was gently cleaned whilst Auto Finesse Lather shampoo provided the lubrication and cleaning power needed. Working from the upper panels down, straight lines and no pressure was put into the wash mitt to prevent any grit particles from being pushed into the paint, instead they would be lifted into the lambswool fibers away from the paint surface until rinsed out in our second bucket.Each panel was washed individually before being rinsed and moving on to the next, this continued until the entire vehicle was complete. The next step was to remove tar spotting, ferrous contamination (or fallout) and any other bonded contaminants from the paint, glass and other exterior surfaces. A dedicated tar remover took care of any tar spots and adhesive left behind from the manufacturing line, which was then followed by a liberal covering of Q2MIron over the entire car. Q2MIron was left to work on the surface and chemically transform any metallic particles into a water soluble state, this chemical reaction is often highlighted by the 'bleeding' effect. After approximately 6-8 minutes the Q2MIron was given a thorough rinse to ensure as much of the residue was washed away as possible. A surface preparation towel (claybar alternative) was then used to physically remove any remaining contaminants that the chemical treatments may not have been able to remove by themselves. After the clay session was complete, the car was given a second layer of foam which would work its way into all the nooks where any tar and fallout removers may have collected, pushing any residues out before a final thorough pressure rinse of every exterior surface.


Bringing the vehicle indoors in order to be dried off, a combination of drying towel and warm filtered air was used to ensure it was totally drip-free. The Maserati was then manoeuvred onto our scissor lift in order to remove the satin black alloys. A wheel alignment tool allowed the wheels to be removed with no damage caused from the wheel contacting the gloss red brake calipers. Once the wheels had been removed, they were taken back outside in order to cleanse the wheels of any remaining brake dust from the inner barrels and rear of the spokes. We also removed any tar spotting from both wheel faces and barrels at this point before a thorough rinse and individually blow drying each wheel. Once the majority of the water had been blown away a Q2MPrep wipedown ensured a thoroughly oil-free surface ready for the Q2RIM ceramic coating a little later in the service. We soaked cotton pads in tar remover and placed them onto the many licence plate sticky pads on the bootlid in order to safely remove them whilst we worked on the wheels.


Moving back to the paintwork, we used our lighting to highlight any defects present in need of removing or improving. We found many places of holograms where the car had been machine polished at the factory and a handful of isolated sanding marks but other than that the Maserati was swirl free with no severe scratching. Gyeon Q2MPrimer was used to prepare the paintwork ready for its ceramic coating. Using a Rupes Bigfoot and Meguiars microfiber cutting pad allowed the Q2MPrimer to remove the majority of holograms and surface defects from the paint whilst simultaneously maximizing gloss and depth. Some isolated sanding marks required a more aggressive machine polish using Q2MPolish on a microfiber cutting pad. The rear bumper was by far the worst area of the entire car with heavy polisher swirls (holograms) and factory defects from the de-nib step. The rear bumper required over two and a half hours of paint correction to ensure it matches the remaining panels of the car. Once these panels were given a more aggressive polish, they too were finalized with a polish with Q2MPrimer. Whilst Q2MPrimer can be coated directly on top of after 24hrs, a wipe down with Q2MPrep allows the surface to be coated upon immediately after polishing. As we had a deadline to be met, we degreased the surface thoroughly with Q2MPrep to leave the paintwork bare in readiness for its Q2MOHS+ application, ensuring we used multiple viewing angles and light sources to spot any residues missed. Once happy we opened our Q2MOHS+ kit and looked to lay down the protection.


The Q2MOHS+ treatment chosen for this vehicle is an exclusive product reserved only for Gyeon Certified Detailers. This system comprises of a two layer construction that is warranted for five years of protection against environmental contaminants, chemicals and loss of gloss. The initial layer (Q2Base) cements the foundations onto the paint surface. The top coat (Q2Phobic) then furter enhances the first Q2Base layer by adding the hydrophyllic, glossy and durable attributes that ceramic coatings have become famed for. The application of this system requires suitable lighting and a precise knowledge of levelling and buffing, which is why it is only available to certified installers.

Between the Q2Base and Q2Phobic layers, a four hour window is required to prevent the solvents contained within the products from negatively affecting one another. In this time we continued to install the remaining coatings on to the other surfaces, beginning with the exterior glass. Just like when applying a coating to other surfaces, preparation is key. That is why the Q2View glass treatment includes Q2MCleanse and Q2Repel; Q2MCleanse being a polish designed to remove surface contaminants and previously installed glass treatments to ensure the very best bond for the Q2Repel, thus, ensuring the best performance and durability. After the glass was prepared using Q2MCleanse the Q2Repel was applied in a thick cross-hatch to ensure maximum coverage on all exterior glass. After a few minutes the residue was buffed away with a brand new microfiber. We always install two layers onto the windscreen and front side windows to ensure the greatest visibility in poor driving conditions.
The exterior plastics were also treated with Q2Trim, Gyeon's dedicated plastic preserver that adds a superb satin finish that offers UV protection against fading. The Q2Trim was applied to the wing mirror bases, rear bumper sections, radiator grill and also all plastics surrounding the engine compartment (Incl scuttle panel). After a few minutes the excess was buffed away ensuring any smears were buffed away from the paint and surrounding areas with a second clean microfiber. Once the plastic surfaces were protected we returned to the satin alloy wheels that we prepared earlier. A thick layer of Q2Rim was applied to the full wheel including faces and barrels ensuring that all the wheel had been covered thoroughly before removing the residues with multiple microfibers. As the Q2Rim is a very thick coating, the use of handheld light sources is essential to see any smears, patching or areas left unbuffed. Once happy that all the residue was buffed well, we applied Q2MTire to the tyre and moved onto the next wheel. This continued until all four wheels had been completed. As well as the wheels, the gloss red brake calipers and black exhaust tips were degreased of oils and residues using Q2MPrep and then protected with Q2Rim. As Q2Rim is a heat resistant ceramic coating it is ideal for protecting these areas where temperatures are increased dramatically regularly. Another benefit of Q2Rim is that it is suitable for use on both gloss and non-gloss finishes; gloss surfaces get a high glass-like finish whilst satin and matte finishes are given a slightly darkened appearance with no addition of gloss.


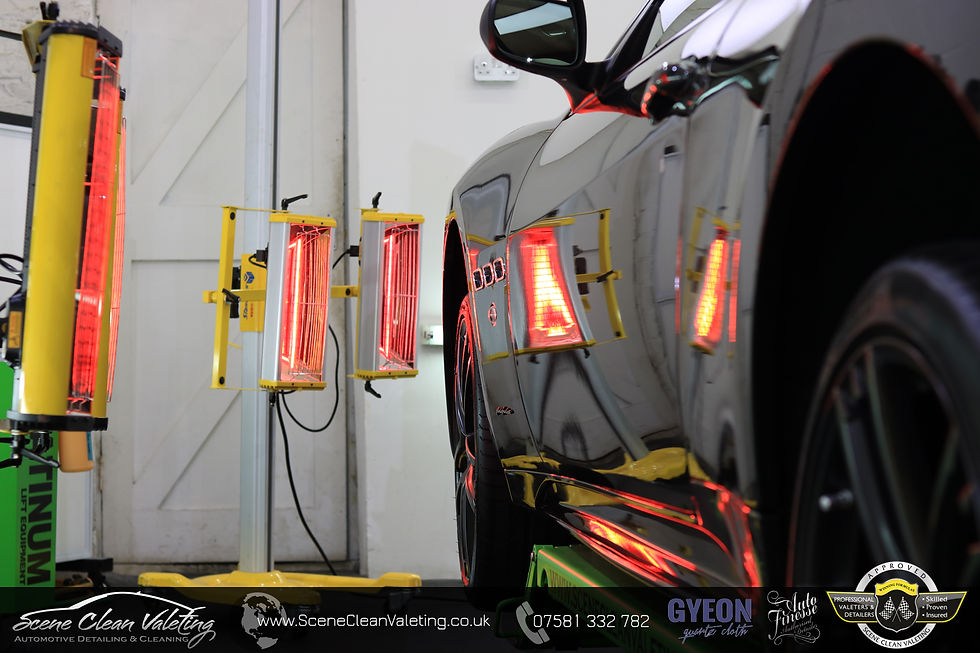
To complete the exterior (and Q2MOHS+) protection it was time to install the Q2Phobic topcoat onto the body. Just like the Q2Base layer, larger panels were split into smaller sections to make it more manageable. A thick layer was applied in a cross-hatch motion to ensure the coating was levelled correctly before brand new microfibers were used to buff away the residue. It is essential that all smears and streaks are removed when using Q2Phobic, so our handheld light source was used to show any missed areas where some additional buffing was required. After the whole car was coated with Q2Phobic, we refitted the alloy wheels using the alignment tools (once again to prevent unwanted damage to both brake calipers and alloy wheels) and secured the wheels with the wheel bolts. Each bolt was torqued to the correct tightness. Infrared lamps were used to cure all coatings to provide the best possible performance and durability, it also reduces the initial cure time down when baked at approx 60 degrees for ten minutes. The engine compartment was given a liberal spray of Auto FInesse Dressle and any excess was wiped way with a clean microfiber to add a satin finish that doesn't overpower the plastics natural appearance. Following the IR curing, a wipe over using Q2MCure is required to ensure the coating is protected for the first seven days after application due to the coating being cured at this point but not reaching its full hardness until up to a week later. It also adds a slickness to the paintwork giving a silky smooth texture.


The interior was also on the agenda to protect, with Q2LeatherShield to be applied to all red leather surfaces and Q2FabricCoat on the floor mats. Firstly, the interior was thoroughly vacuumed of dust and debris ensuring that the leather seats were separated to remove anything that may potentially scratch the leathers surface. Q2LeatherShield was applied to a Gyeon applicator suede and spread evenly over all the leather present on the interior and left to naturally cure to a matte finish. This included the seats. steering wheel, door upholstery, center console and dashboard trim. Floor mats were removed from the car and two applications of Q2FabricCoat were applied back to back using a gloved hand to massage the protection onto every fiber and placed back into the footwells. Interior glass was cleaned free of any build up and smudges using Auto Finesse Crystal and Spritz was used to add an anti-static protection onto any plastic trim. We finally buffed the exterior glass using Gyeon Q2MGlass to remove any remaining residues and ensure a crystal clear finish; we used Q2MGlass rather than cure due to it being coating friendly and not causing any damage to the freshly applied treatments. Once all exterior glass panels were buffed the Maserati's detail was complete.


As the owner was still away upon completion of the car, we were asked to deliver it back to their home. Of course we were happy to do so, and luckily the weather was on our side.


- Aaron


Comments